
JAMIE OLIVER'S CHICKEN KORMA
/Inspired by the to die for curries at G’raj Mahal we enjoyed on a trip to Austin, TX and the amazing pasture chicken we used to get from Surfside Chickens when we lived in California, we decided to try our hand at making an Indian dish a few years ago and it is now a staple. We landed on Jamie Oliver’s Chicken Korma from his Food Revolution cookbook. The recipe is straightforward and easy to shop for. It does use a curry paste, but still has plenty of freshness.
There is a wonderful depth of flavor (surprising considering it doesn’t even cook for that long!), great texture and flavor contrast from the mix of soft onions, tender chicken meat and buttery chickpeas. And while we love Indian food, it can often seem a bit oily and heavy. This dish is not. It is comforting yet not heavy or greasy. We serve it over a pile of brown basmati rice. Yum.

If you are not familiar with Indian curries, this is a wonderful one to start with. It is mild (I’m a wimp when it comes to hot spices) with only a hint of heat yet has great flavor.
I have never had chickpeas in Korma before but I like it. They took on a wonderful flavor and buttery smooth texture and it is a wonderful way to help stretch out the chicken since they add to the heartiness of the dish.
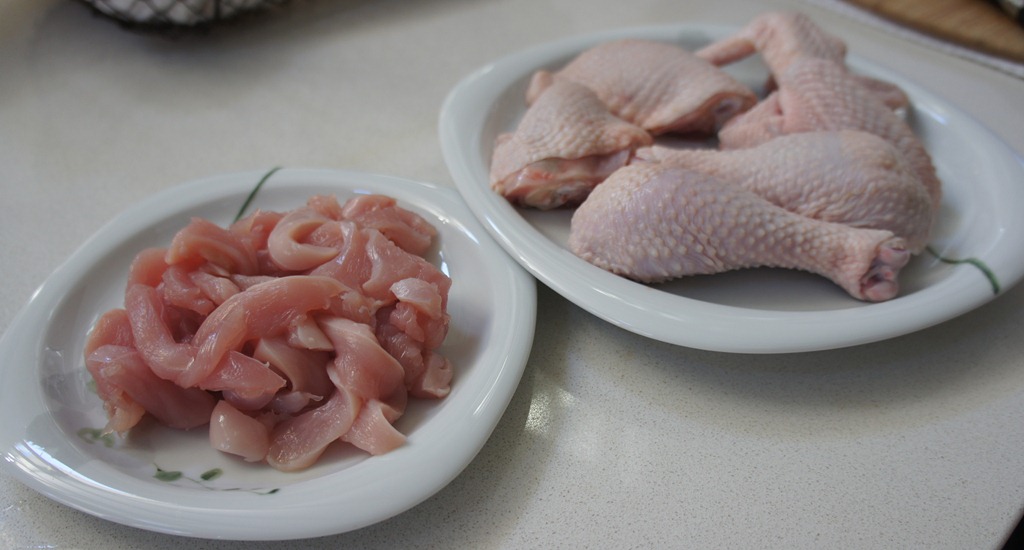
We actually halved the recipe since it was just the 2 of us and it worked out perfectly with the portion of chicken breast we were able to get from that week’s Surfside Chicken. I divided up the rest of the chicken too, so we had vacuum sealed packs of 2 chicken thighs, 2 wings, 2 drumsticks and the body in the freezer waiting to be turned into another meal.
This is a great dish to make for company since you can make it before your guests arrive, leave it on the stove and simply warm back up before serving. In fact, the first time we made it, my husband finished cooking it by 5pm, we left it on to simmer for a little longer and then turned off the flame, and left it covered on the stove. We warmed it back up at 7pm when we were ready for dinner. I bet the curry flavors developed even further with the extra time. Our brown basmati rice was also just waiting for us to be ready sitting piping hot in our rice cooker.
CHICKEN KORMA
From Jamie Oliver’s Food Revolution cookbook with notes from our experience.
Serves 4-6
Ingredients
1 3/4 pound skinless boneless chicken breast, preferably free-range or organic
2 medium onions
optional: 1 fresh green chile (we left it out since I’m a wimp)
a thumb-sized piece of fresh ginger
a small bunch of cilantro (an easy herb to grow in your yard!)
1 15oz can of garbanzo bean (chickpeas)
peanut or vegetable oil (We used olive oil. Using Ghee would probably be delicious as well)
1/2 cup korma or mild curry paste, such as Patak’s
1 14oz can of coconut milk
a small handful of sliced almonds, plus extra for serving
2 heaping tablespoons of unsweetened shredded coconut
2 cups natural yogurt
1 lemon
Directions
To prepare your curry
Cut the chicken into approximately 1-inch pieces or thin slices. I find slices will result in more tender and flavorful chicken.
Peel and finely slice the onions.
Halve, seed and finely chop the chile if using it.
Peel and finely chop the ginger. If you don’t like eating ginger, be sure to chop it finely so that it melts away in the dish or cut slightly large pieces/slices so you get the flavor but you can easily opt to not eat the ginger pieces themselves.
Pick the cilantro leaves and finely chop the stalks. (love that both stalks and leaves are used!)
Drain the garbanzo beans.
To make your curry
Put a large casserole-type pan on high heat and add a couple lugs of oil. Once hot, add the onions, chile, ginger, and cilantro stalks with the butter. Keep stirring it enough so it doesn’t catch and burn but turns evenly golden. Cook for around 10 minutes. Add the curry paste, coconut milk, half the sliced almonds, the drained garbanzo beans, unsweetened shredded coconut and chicken breasts. Half fill the empty coconut milk can with water, pour it into the pan and stir again. Bring to a boil, then turn the heat down and simmer for 30 minutes with the lid on.

Check the curry regularly to make sure it’s not drying out, and add extra water if necessary. When the chicken is tender and cooked, taste and season with salt and pepper – please season carefully. I did add a fair amount of salt, you’ll want to taste, add some salt if needed, stir and let cook for a few minutes, then taste again to see if it still needs more or not. Better to add little by little than overdoing it.
To serve your curry
Jamie includes various recipes for making rice as options to serve with this dish. Good old plain basmati rice works well. In fact, we used brown basmati rice and thought it was perfect.
Jamie also suggests: Add a few spoonfuls of natural yogurt dolloped on top and sprinkling over the rest of the sliced almonds. Finish by scattering over the cilantro leaves and serve with lemon wedges for squeezing over.
We served individual plates, since it was just 2 of us. I put a heafty scoop of rice on my plate (really a pasta bowl), hollowed out the middle and filled it with a few serving spoons full of korma. Very pretty. We skipped the yogurt, even though we had gotten a small container of Greek yogurt for the dish. We found the dish rich enough that we didn’t feel it needed the yoghurt. We did sprinkle on the cilantro leaves (we chopped them a little first) which made the dish look extra pretty and added nice fresh flavor. We completely forgot about the lemon wedges since we were hungry and excited to eat! It was still amazing, so if you don’t happen to have lemons, don’t sweat it.